

How To Draw A Rabbit Anthro
Fiftyittle fluffy bunnies are some of the cutest animals you can depict. Maybe you would love to larn how to draw a bunny, simply yous are afraid that they are too complicated? Does the idea of drawing fur make y'all want to pack up your pencils and telephone call it a day? In this wonderful invitee tutorial by Sabrina Hassler, we want to evidence you how piece of cake it is to draw a beautiful bunny, fur and all.
Tabular array of Content
- 1 How to Describe a Rabbit Step by Stride: Simple Bunny Drawing Tutorial
- one.1 Gather Your Materials Together
- i.two Pace 1: Sketching Out Your Rabbit Drawing
- one.3 Step 2: Fleshing Out Your Sketch
- one.4 Stride three: Time for Some Lite Shading
- one.v Stride 4: Let Us Make That Shading Darker
- 1.six Step 5: Transitioning Softly
- 1.7 Pace 6: Adding Highlights with Your Eraser
- 1.8 Step 7: Time to Draw the fur
- 1.9 Step 8: Amping Upwardly the Contrast
- 1.10 Stride 9: Adding the Final Details
- 1.xi Pace 10: Adore Your Cute Creation
How to Draw a Rabbit Stride past Step: Simple Bunny Drawing Tutorial
With their twitching olfactory organ, long and slender ears, large round eyes, and fluffy fur, rabbits are beautiful creatures. Rabbits are typically individual animals, then information technology is rare to see ane out in nature. Although at first glance, it may seem daunting to learn how to draw a bunny, in this elementary, step-by-pace tutorial, we break the procedure downwardly into manageable steps. Before you know it, you will exist rabbit cartoon with ease.
Gather Your Materials Together
Having the right tools at your disposal is the starting time step to creating an easy bunny drawing. If you do not have the right pencil or eraser, drawing a rabbit will exist then much harder than it needs to be. Nosotros suggest you take this basic equipment:
- Good quality drawing paper should exist heavy with a fine texture, similar this Strathmore sketching paper.
- A set up of sketching pencils – we like the ones from Faber Castell.
- A cotton swab or a blending stub if you have one.
- A adept eraser like this one from Staedtler.
If you are new to sketching, you may similar to have a reference photograph of the bunny you lot want to depict. For this tutorial, we used this photograph of a cottontail bunny by lensman Deena Sveinsson. Go along reading to find out how to draw a rabbit footstep by step.
Step ane: Sketching Out Your Rabbit Drawing
The first step is learning how to draw a bunny face. Although you will stop up erasing much of this initial sketch, it is an essential start step in learning how to draw a rabbit. Our first tip is to use an HB or H pencil when outlining this initial sketch and to try not to press hard. You want to be able to erase these guiding lines completely.
The all-time mode to capture the correct proportions in any animal drawing is to break information technology down into simple shapes. When learning how to draw a bunny face, the best shapes to apply are ellipses.
- Begin with a unmarried, fairly large, and elongated ellipse in the centre of your page. This kickoff shape is the main body of your rabbit'south head.
- Depict a curving cross within this primary ellipse. Ideally, you want the center verticle line to bulge in the same direction that the rabbit's head is facing in your composition, and yous desire the horizontal line to bulge downwardly. This cross helps you identify the facial features on your bunny.
- For the ears, y'all are going to describe the next two elongated ellipses that meet in the top third of the face. It can be helpful to look at your reference photograph to help you get the right angle in the ears.
- To mark out the chubby bunny cheeks, you can draw some other slightly fatter and horizontal ellipse. This ellipse should fit between the bottom of your chief face shape and the horizontal cantankerous-section.
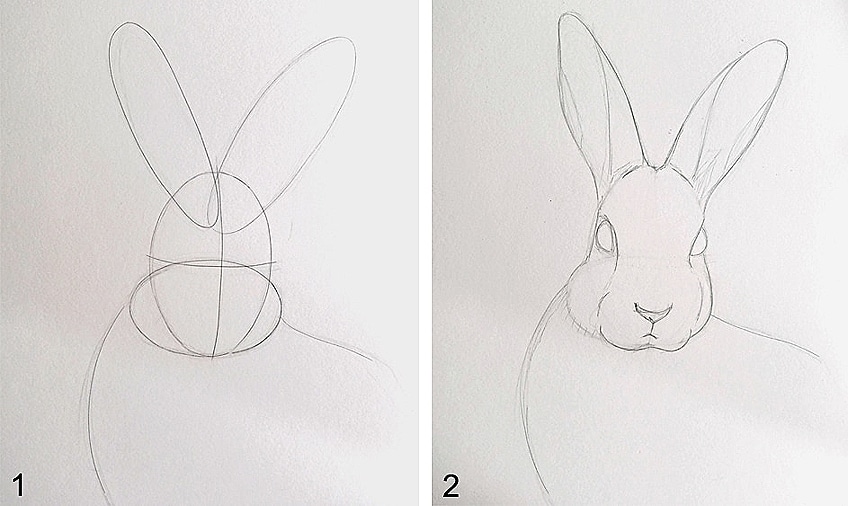
Step 2: Fleshing Out Your Sketch
Now that you accept the basic anatomic proportions of your rabbit cartoon downwards, it is time to mankind it out. You tin use the cross to add together beautiful eyes, a little nose, and a fluffy chin to your simple bunny drawing.
- The eyes should sit merely above the horizontal line of the cantankerous. A bunny's eyes are more than towards the side of its head, and its olfactory organ protrudes in front of them. You lot can easily capture this difference in depth past drawing a pocket-size line from the pinnacle of the eyes and curving down and inward.
- Your bunny's nose should sit but to a higher place the bottom of its face. Yous can use the vertical line of the facial cantankerous to place the nose correctly. It is shaped a lilliputian like a crescent moon. Rabbits' noses tend to stick out a little more than correct at the bottom, and you tin capture this shape with two small outwardly curved lines from the base of the mentum to in line with the nose.
- You will notice that the ears of your bunny in the reference photograph are not a polish ellipse. The ears are a little more narrow at the tip, and about halfway down, they begin to widen. You lot can advisedly change the shape of your rabbit's ears. Finally, add in the line to differentiate betwixt the inside and exterior of the ears.
- The last footstep in the fleshing out process is to join the outlines of your ellipses together with a smooth line. Once you have created a fleshed-out sketch of your bunny, you lot can erase the construction lines.
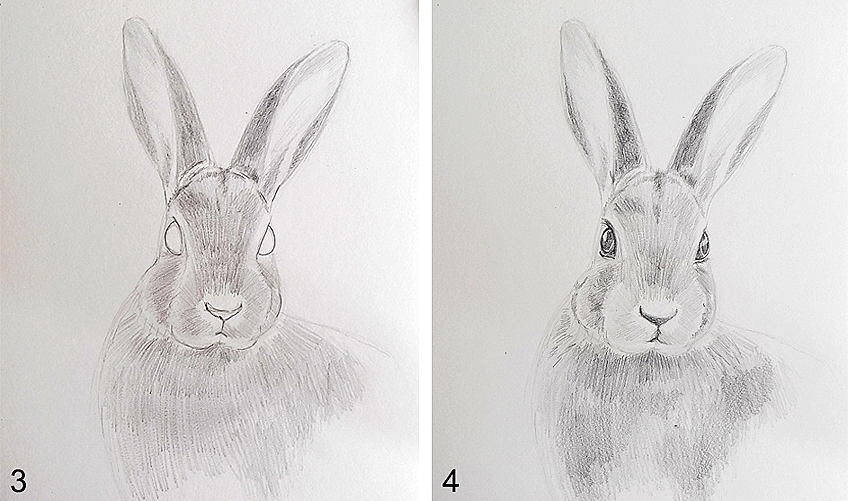
Step iii: Time for Some Light Shading
Shading is an integral part of any sketch because information technology helps to create dimension and depth. The exact areas that you volition shade depend entirely on the reference photograph you are using. It is best to use a 2B or HB pencil for this kickoff circular of light shading, and remember not to make things too night just still.
- For this starting time shading step, yous desire to locate the dark and medium shadow areas in the reference photo. In sketching, we use shading to emphasize shadow and dimension, then information technology can assistance to determine if and where the light source in your limerick is.
- In our limerick, we added this get-go round of light shading to the inner and outer edges of the rabbit'southward ears, with more emphasis on the inner portion. We also add together a little down the span of the bunny'southward nose just over the eyes. Nosotros also added light shading on the cheeks behind the nose.
- Even in this first stage of shading, you lot must make sure that y'all shade in the correct direction. You can add together a lot of shape and dimension to a sketch by shading with the direction of the differently shaped components. In terms of this simple bunny drawing, make sure that your olfactory organ shading follows the shape of the nose. Another important place for you to consider the management of your shading is on the bunny's cheeks. You desire to shade outwards and downwards.
- Be careful not to get too trigger happy with this initial shading. If in that location are very light areas on your photograph, leave them blank on your paper.
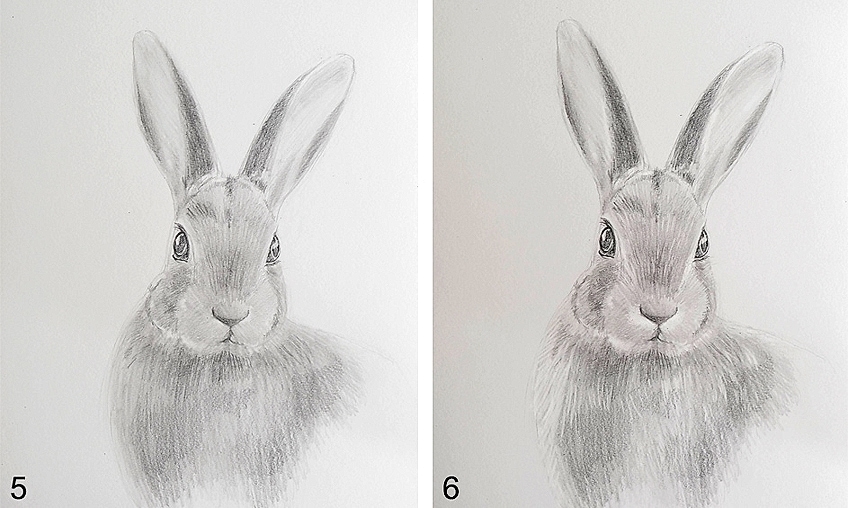
Step 4: Let U.s.a. Make That Shading Darker
This step is pretty much what it says on the tin. Using a softer pencil from your set up, preferably a 4B, you want to add to the very darkest areas of your rabbit drawing.
- At this stage, yous can shade in the optics of your rabbit. When doing this, exist sure to leave the highlighted surface area (as on the photograph) blank.
- Softer pencils like the 4B are darker because they accept more than graphite than an HB pencil. While this darkness is exactly what we desire at this stage, information technology is much harder to erase these pencil marks completely. Have it slowly when adding this darker level of shading, as y'all may non be able to undo it.
Pace 5: Transitioning Softly
With your areas of night shading contrasting with the blank spaces of paper, your simple bunny drawing will non be looking similar a polished product nonetheless. In this step, we are going to be gently blending the darkest areas of shading with the blank newspaper. You will demand a blending stump or a cotton swab for this step.
- Using your blending instrument, you lot are merely going to wipe gently over your pencil lines. As you did with the shading, be sure to move your blending musical instrument in the right management to add dimension.
- As yous gently alloy out your darker areas of shading, you will elevate small amounts of graphite into the blank spaces. This step is essential if you want a smoother and more coherent-looking cartoon. Yous are, of course, more than welcome to get out this step out if you like a slightly rougher finish.
Footstep 6: Adding Highlights with Your Eraser
The highlight is simply as important equally the shading when information technology comes to making your simple bunny drawing pop. Nosotros take the shading downwards, and so it is time to pay attention to the highlights. For this step, we recommend using the sharp edge of an eraser or the eraser on the end of a pencil.
- Try to observe the brightest areas in your bunny reference photo. In our reference photo, these highlighted areas are around the olfactory organ, on the bridge above the eyes, on the tips of the ears, and in the optics themselves.
- During the last blending step, you may have dragged some graphite over these precise areas of highlight. You lot tin can look at the example drawing to get a better thought of where exactly you may desire to erase.
- The wonderful thing about using a precise eraser is that you can create very sparse, hair-similar highlights. Adding highlights like this can aid make your drawing more than realistic.
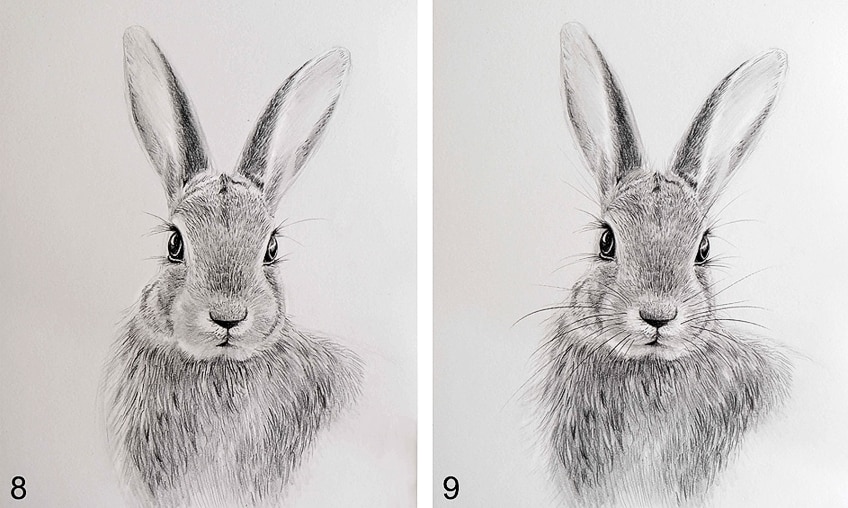
Step seven: Time to Depict the fur
Drawing the fur may exist i of the nigh daunting parts of this simple bunny cartoon tutorial because it looks similar a lot of work. In truth, you lot have already laid much of the groundwork for the fur, so you lot take nothing to worry about. For this stride, you are going to need a very nighttime pencil – whatever one between a 4B and a 9B.
- Post-obit the direction of your shading and highlights, depict lots of tiny individual hairs with your pencil. The hairs on the ears and caput of your rabbit are much shorter than those on the body. Brand sure that yous echo this with the length of your pencil strokes. The hairs on your bunny's nose are particularly short, and you lot tin even use dots to capture them.
- The hairs on the trunk of your rabbit will be a little longer and can be slightly curved. The hairs on the body can likewise be a little darker if y'all similar, as this can help add some dimension to your simple rabbit drawing.
- Non all hairs grow in the same direction. Drawing the hair in the right direction, just similar with the shading, can add together a lot of dimension to your drawing.
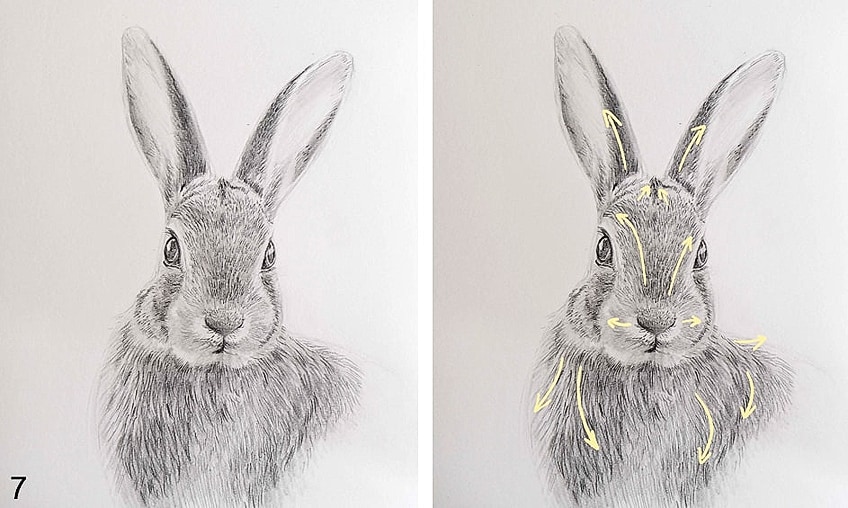
Pace viii: Amping Up the Dissimilarity
Using a black coloring pencil or even a black crayon, we are going to make the dark areas even darker. This footstep of the unproblematic bunny drawing tutorial increases the contrast in your drawing, making it more three-dimensional and realistic.
- The eye is automatically attracted to darker areas in an paradigm. Adding more black to the optics, olfactory organ, and mouth will attract the eye of your viewer.
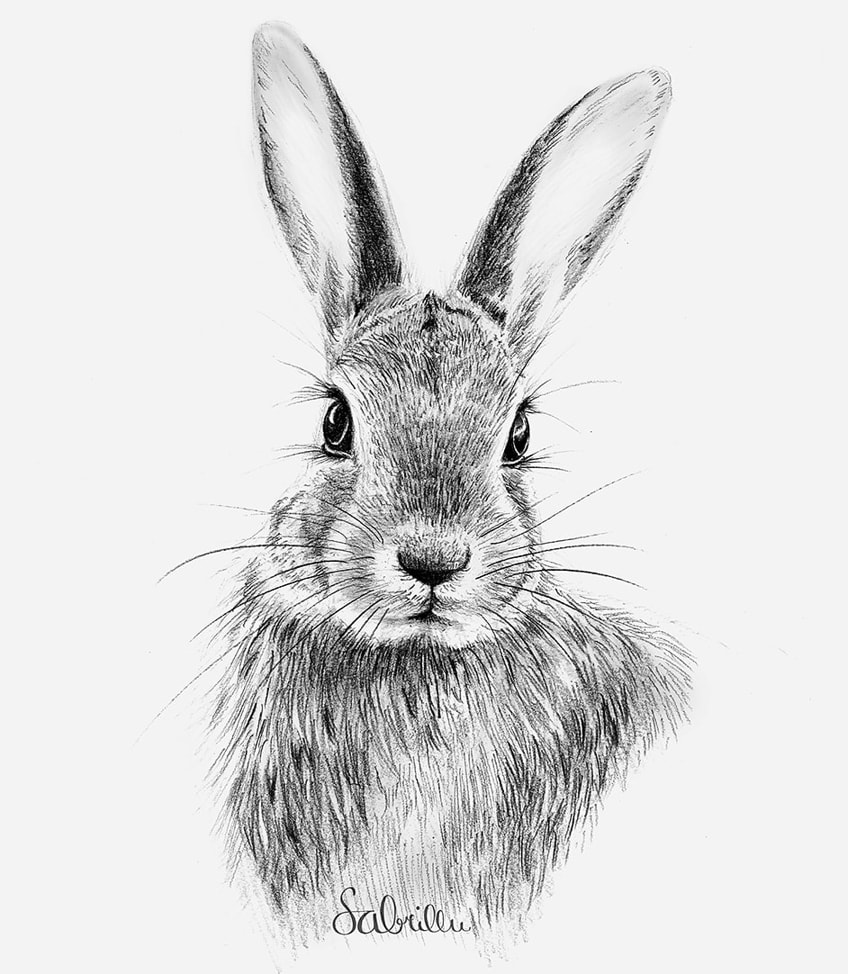
Footstep nine: Adding the Final Details
Your beautiful rabbit drawing is most complete! In this final stage, we are adding the final details that cease off your cartoon, specially whiskers and eyelashes. Nosotros recommend using a harder pencil for these terminal details, like an HB, because we do not want them to exist very dark. Difficult pencils also do not get blunt every bit quickly every bit soft pencils, and so you can maintain an even stroke width.
- Your rabbit'due south long whisker hairs tend to exist very thin and quite light, so yous need to motility your hands quickly. Brainstorm each stroke by pressing firmly on your pencil, and ease off as you finish the stroke. This variation in pressure volition make the whisker darker and thicker at the base and create a beautiful taper at the end.
Footstep 10: Admire Your Beautiful Creation
Only like that, you take created a beautiful and easy bunny drawing. We actually hope you have enjoyed using this tutorial and that you are happy with your terminal drawing. Now that you know how to draw a rabbit, yous can endeavor cartoon some other fluffy creatures. We hope that this tutorial has inspired your creativity and given you the tools to keep creating and experimenting!

Sabrina Hassler
This unproblematic bunny drawing tutorial was given by Sabrina Hassler, an Austrian freelance illustrator. Sabrina specializes in creating beautifully detailed pencil drawings of animals and people. Post-obit her 5-yr-long education at fine art school, Sabrina studied educational activity for elementary school and music. Sabrina has been working as an creative person and illustrator since 2022, and nearly of her clients are publishers and advertisement agencies. Sabrina loves to share her noesis and passion for fine art with others, and we thank her kindly for this unproblematic but effective tutorial.
https://www.instagram.com/sabrillu_/
https://web log.sabrillu.com

Source: https://artincontext.org/how-to-draw-a-bunny-face/
Posted by: epleymisibromes.blogspot.com
0 Response to "How To Draw A Rabbit Anthro"
Post a Comment