

How To Draw Milky Way In Photoshop
Tutorial – How to add the Milky way in photos
Commonly, my post-processing is restricted to the brackets that I have of a detail scene. I try to bring out, equally much every bit possible, the all-time in that scene. Sometimes, however, I feel that an image can do good from some artistic blending of divide images. In this tutorial, we'll look at how to add together the Milky Mode in photos.
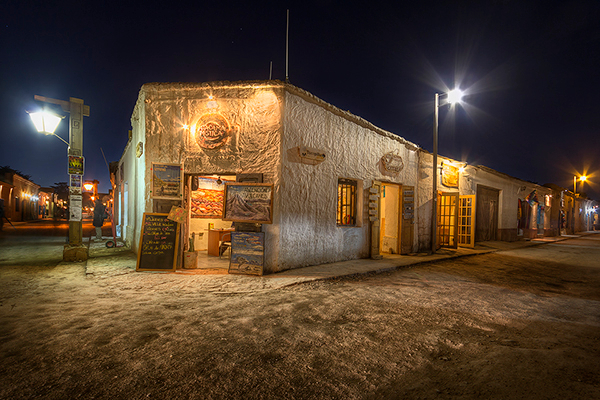
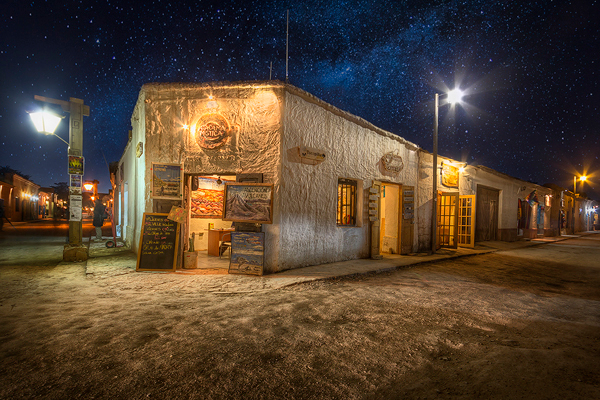
The earlier and after beneath is a keen case of this. The desert town, San Pedro de Atacama, has a Spaghetti Western feel to it. In this paradigm, I was happy with the foreground only felt the sky was lacking.
I took the Milky Way from an image I'd shot the mean solar day earlier and blended them. In this short tutorial, I'll bear witness you how to exercise the same very quickly and I will also give a full-size epitome of the Milky way to piece of work with. Please don't try to sell the image. I'm giving it to you to use on images that you can sell or use commercially only the entire image is non for commercial use.
Before and After
If yous wish to experiment with this, I would really appreciate it if yous included my proper name (Jimmy McIntyre) and www.shutterevolve.com when you publish your image. If you postal service your published paradigm on our Facebook page I'd be happy to bank check it out.
-Tutorial Continued Below-
Enter your electronic mail beneath and bring together our community of more 100,000 photographers who receive regular tutorials and have likewise

Subscribed to our newsletter,
Downloaded our Gratuitous Photoshop Course
Got our FREE Easy Panel for Photoshop
And have our Costless Essential Guide To Luminosity Masks E-Volume
How to add stars to an image in Photoshop
–The diagram– Click to enlarge
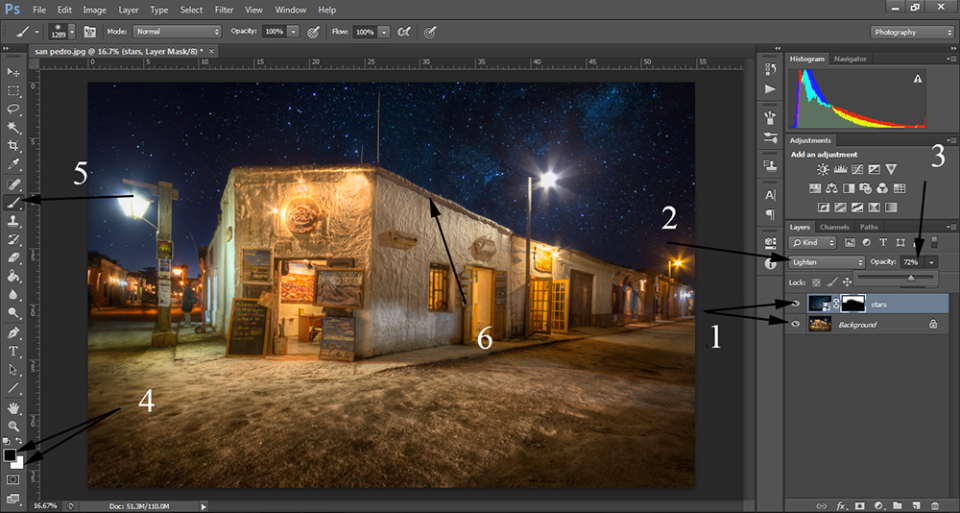
–What the numbers hateful—
1. Identify your main image as the bottom or groundwork layer. Drag the Galaxy on elevation of that layer.
ii. Change the Blend Mode to Lighten. This will remove everything from the top layer that is darker than the corresponding area on the layer below. In other words, mainly just the stars or star clusters will exist visible from the top layer now.
3. Change the Opacity according to how bright y'all'd similar the stars to exist.
4. Brand certain the colors selected are Black and White, as you see in the picture. Then create a Layer Mask by clicking on the square at the bottom of the Layers panel (make sure the Stars layer is selected beforehand)
5. Finally, select the brush tool and start painting out the stars that are over the buildings and the balance of the foreground, leaving just the stars in the sky.
6. This is just to show that yous need to pigment carefully around the edges, so equally not to create a night, star-less halo around the foreground.
And that's information technology!
You may be request, why do nosotros demand to change the Blend Style? Why tin can't we just mask out the foreground of the Stars image? Well, give it a try and meet how hard it is. This mode, y'all continue all of the luminosity of the original heaven and do not effect the foreground at all. It doesn't get much easier.
I other tip, the primary photograph was shot towards the cease of blue hour when the sky is incredibly nighttime. Adding stars to this sky was fine. However, stars added to skies during a rich blue hr would look out of place. The darker the sky the better.
You can download the full-sized Milky way shot here:
Download Milky Style – this paradigm hosted on a separate site. It is free to download the photo and doesn't require an account. Simply click Download to get the epitome.
I hope you've found this tutorial on how to add together the Milky Manner in photos useful. If you have, and you retrieve others might detect it beneficial, feel free to share it and assist to build the resources on this site.
Thank you for reading this tutorial on how to add the Milky Way in photos, be certain to sign upwardly for our newsletter for more tutorials and great offers.
Enter your email below and join our community of more than than 100,000 photographers who accept besides
Subscribed to our newsletter.
Downloaded our FREE Photoshop Course.
Got our FREE Easy Panel for Photoshop.
And, have our FREE Essential Guide To Luminosity Masks E-Volume.
Offer Catastrophe Before long – Claim An Extra 25% Discount Today
To go directly to any of our products, only click on the image below.
Shutter Evolve Complete Product Range
– Other Related Tutorials on the Internet –
Vibrant Shot
Youtube Video past Gerry Vanderwalt

Source: https://www.shutterevolve.com/how-to-add-the-milky-way-in-photos/
Posted by: epleymisibromes.blogspot.com
0 Response to "How To Draw Milky Way In Photoshop"
Post a Comment